How to create an Action Plan?
The Action Plan is the central tool for recording anomalies, identifying root causes, and defining corrective or preventive actions. This guide explains the step-by-step process for creating a new action plan in the web portal, from filling in the header to recording the expected impact and the effectiveness verification.
1. Access the Action Plans page
In the main menu, navigate to Action Plans. The page displays the consolidated table with all plans visible to your profile.
To create an action plan, you need to have the Create and edit action plan permission assigned to your user. If you don't see the create button, contact the workspace administrator or your organizational unit manager to check your permissions.
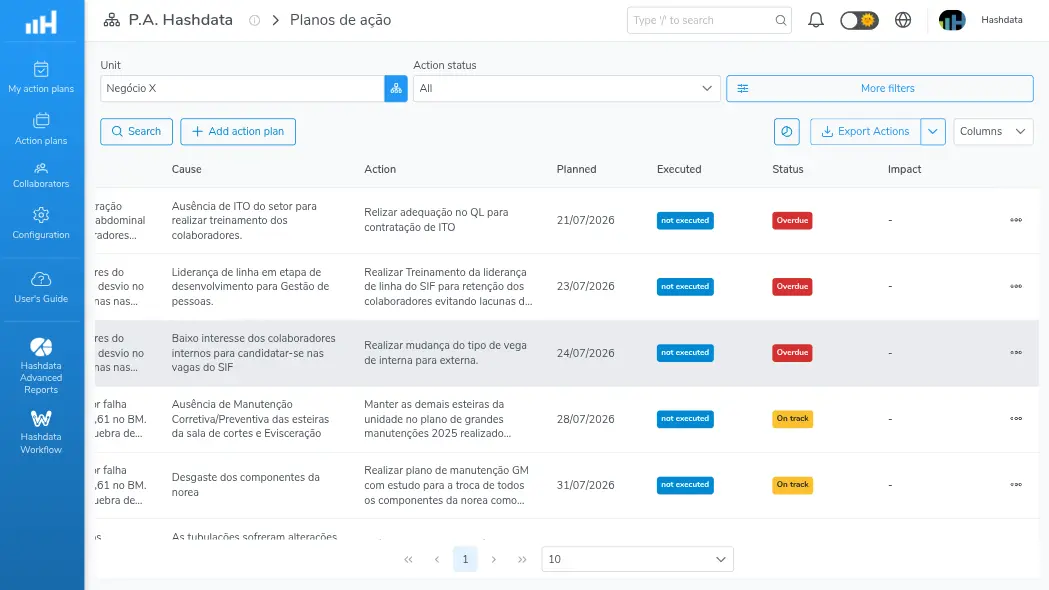
Action Plans table
2. Create a new Action Plan
Click the Add action plan button, located in the top-left corner of the screen (next to the Search button). A sidebar will open on the right with the plan's header fields.
Fill in the fields as described in the table below:
| Field | Description | Required |
|---|---|---|
| Unit | Organizational unit responsible for the plan | Yes |
| Source | Moment that generated the need to create the action plan | Yes |
| Indicator | Indicator for which the plan is being defined | Yes |
| Indicator subgroup / Project | Identification of the project the plan refers to, or further detail on the indicator. E.g.: Project 01 – Increase efficiency from 76% to 82% by Dec/2026 | No |
| Preparer | Person responsible for preparing the action plan | Yes |

Filling in the Action Plan header
The Indicator subgroup / Project field is useful for distinguishing plans that address the same indicator in different contexts, such as specific projects or analysis subgroups (e.g., Yield (Kg/ton) Sausage).
3. Add an Anomaly
With the header filled in, click Add anomaly. A dialog will open to record the anomaly that motivated the plan.
Fill in the anomaly fields:
| Field | Description | Required |
|---|---|---|
| Indicator | Indicator associated with the anomaly | Yes |
| Indicator subgroup / Project | Further detail on the indicator or identification of the project | No |
| Description | Describe what is deviating in the process and causing the problem. E.g.: temperature 10 °C above standard | Yes |
| Perform cause analysis | Enables the "5 Whys" analysis to identify the root cause | No |
| Cause (WHY) | Describe the root cause that generated the anomaly in the process. E.g.: faulty control valve | Yes |
| Attachments | Evidence files related to the problem | No |
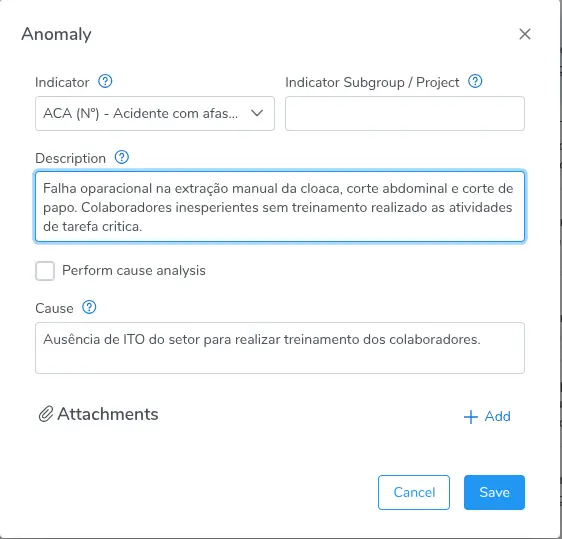
Registering an Anomaly
The "5 Whys" cause analysis helps identify the true root cause of the problem, preventing actions from being taken on superficial causes. Enable the Perform cause analysis field to go through each level of questioning before recording the final cause.
The Cause field is required. A detailed analysis of the process is important to identify it, since the effectiveness of the actions depends on correctly understanding the problem's root cause.
An action plan can contain multiple anomalies. Repeat this step for each deviation identified.
4. Add an Action (5W2H)
Within the recorded anomaly, click Add action. The Action 5W2H sidebar will open on the right with the fields to detail the corrective or preventive action.
Fill in the fields following the 5W2H methodology:
| Field | W | Description | Required |
|---|---|---|---|
| Action | WHAT | Describe the specific task to be executed to address the identified cause. Must start with an action verb (e.g., create, hire, purchase, analyze). E.g.: Replace the control valve with a new one | Yes |
| How | HOW | Describe the step-by-step needed to execute the action, detailing the procedure, tools, and resources required | Yes |
| When | WHEN | Agreed date for executing the action | Yes |
| Where | WHERE | Describe the location where the action will be executed (area, line, equipment part, etc.) | No |
| Executor | WHO | Person responsible for executing the action. This person must be informed of their responsibility to execute the action by the defined deadline and to report when the action has been completed | Yes |
| Cost | HOW MUCH | How much investment the action requires for execution; to be filled in with the value in R$ | No |
| Type | — | Classify the type of action (configurable in the module settings) | No |
| Regulatory deadline | — | Delivery date for the regulatory body | No |
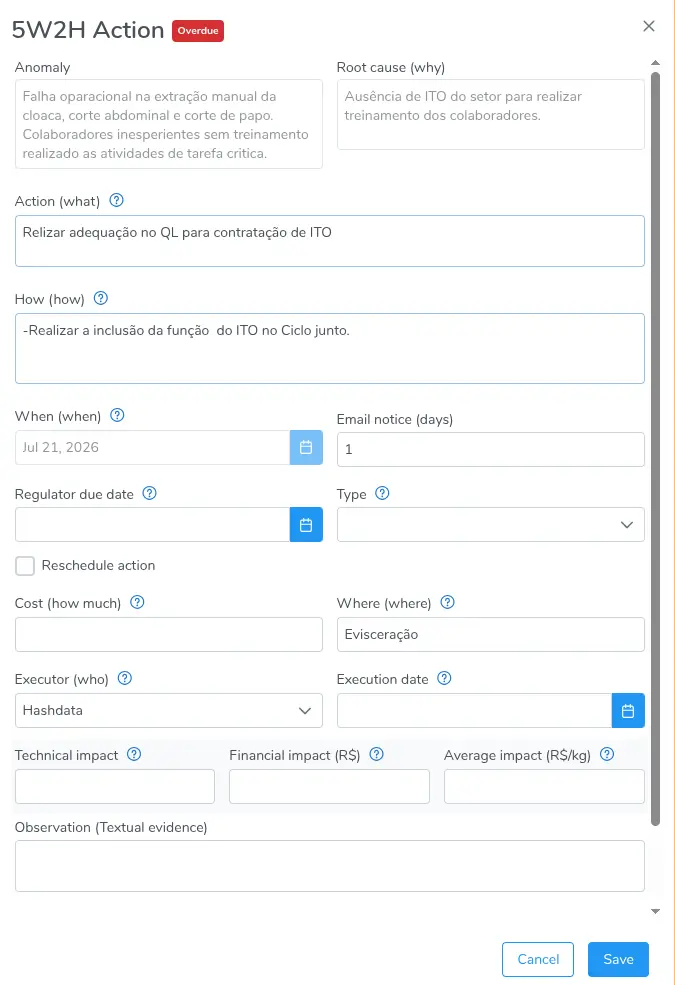
Registering an Action (5W2H)
The Type field is configurable by the module administrators in the settings section. Use it to categorize actions according to the taxonomy defined by your organization. See how to create and manage classifications in Action Types.
An anomaly can contain multiple actions. Repeat this step for each action needed to address the identified cause.
5. Record the expected Impact
Recording the impact is optional, but recommended to measure the return of the planned actions. The impact fields are available within the action's form.
| Field | Description |
|---|---|
| Technical impact | How much the action will improve the indicator. Must follow the indicator's unit of measurement. E.g.: Yield in R$/ton |
| Financial impact (R$) | How much financial return the projected improvement from the action will bring |
| Average impact (R$/kg) | How much unit financial return the projected improvement from the action will bring |
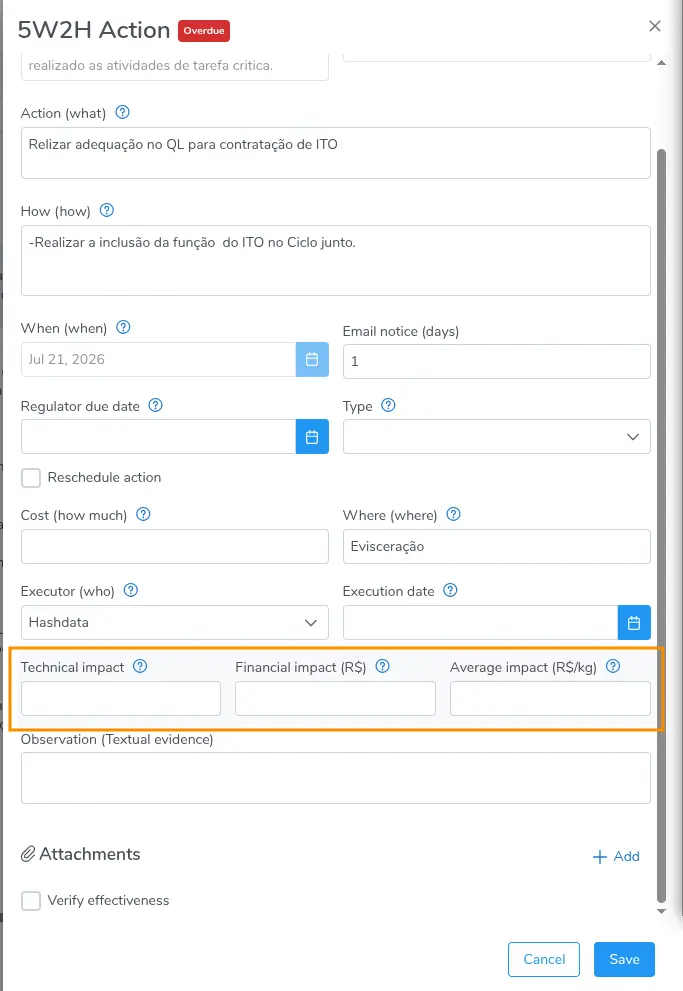
Recording the expected Impact of the Action
Fill in the technical impact exactly following the unit of measurement of the indicator associated with the plan. This allows the system to consolidate and compare projected impacts consistently in reports.
6. Configure the Effectiveness Verification
Effectiveness verification is an optional step that lets you schedule a review after the action is completed to confirm whether the problem was actually resolved. The configuration can be done within the action's own form.
The available fields are:
| Field | Description |
|---|---|
| Responsible | Person responsible for performing the effectiveness verification |
| Deadline | Days after the action's execution, or a specific date, for the verification |
| Email notice | Configures sending an email notification to the responsible person as the deadline approaches |
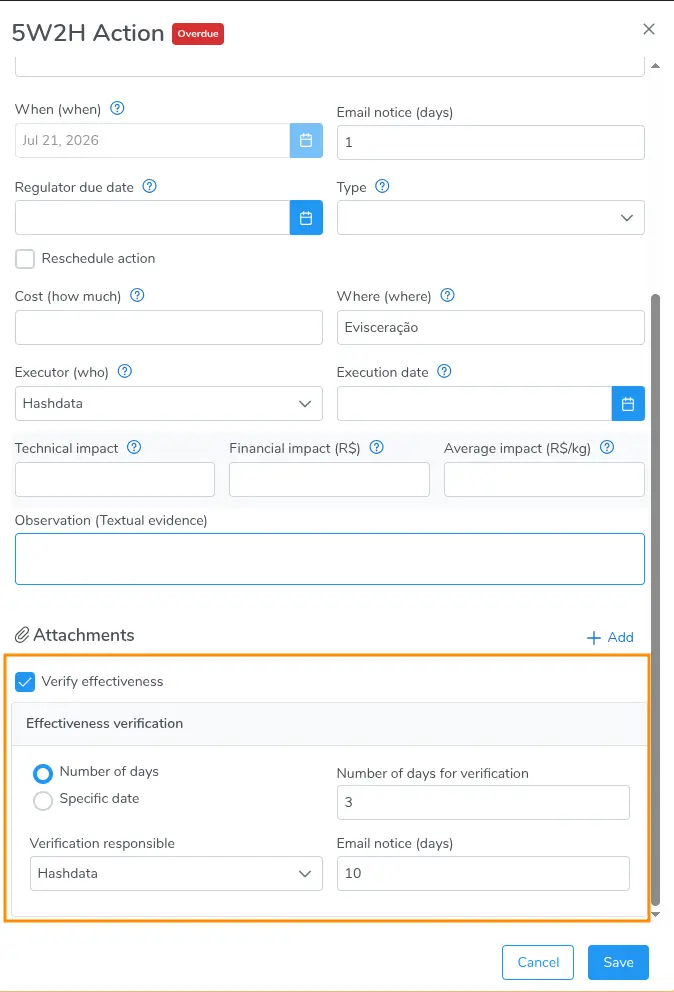
Configuring the Effectiveness Verification
After the action is completed, the person responsible for verification will receive a notification and will be able to record the result of the effectiveness analysis directly in the action plans table, via the context menu Perform effectiveness verification.
To understand the full lifecycle of an action and how effectiveness verification fits into the process, see Learn more about the lifecycle and effectiveness verification.
7. Save the Action Plan
After filling in all required fields, click Save. The action plan will be recorded and will appear in the action plans table with the initial status of the actions.
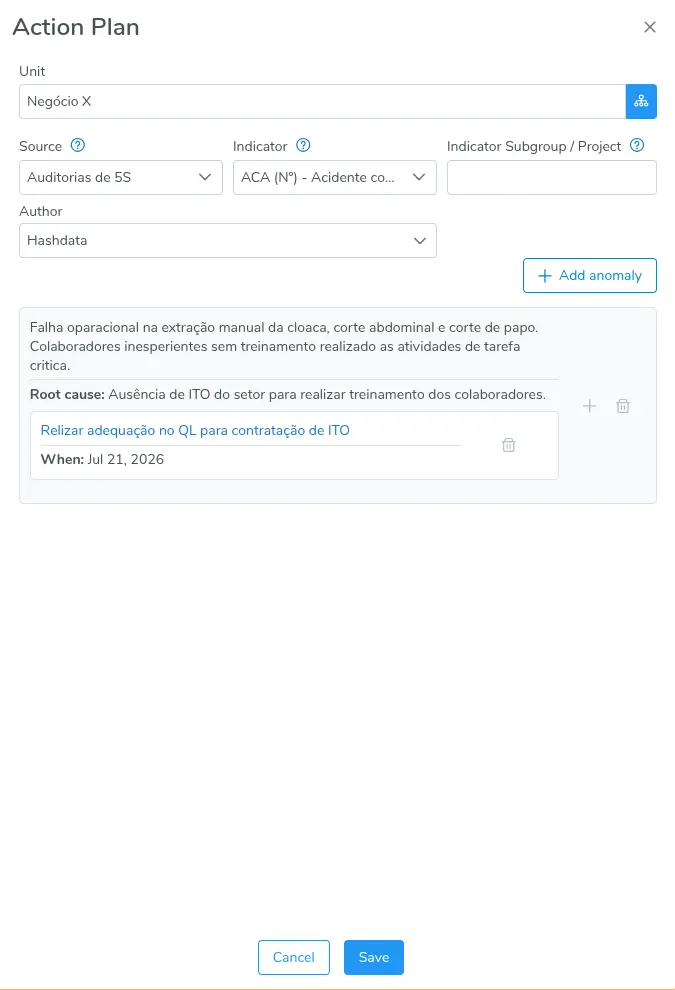
Action Plan filled in, with anomaly and action linked, ready to be saved
The status of each action is calculated automatically based on the defined deadline and the completion date. The possible statuses are:
- On-time action — the action is still within the deadline
- Overdue action — the deadline has passed and the action was not completed
- Awaiting verification — the action was completed and is awaiting effectiveness verification
- Verification overdue — the effectiveness verification is overdue
- Completed action — the action was completed within the deadline
- Completed action (late) — the action was completed after the deadline
- Cancelled action — the action was cancelled
To learn how to manage, filter, and update plans after creation, see Action Plan Lifecycle.
Use cases
Food industry — Temperature control
Scenario: The cooking process shows a recurring temperature deviation.
| Field | Value |
|---|---|
| Anomaly | Temperature 10 °C above standard in the cooking process |
| Cause (WHY) | Faulty control valve in the steam line |
| Action (WHAT) | Replace the control valve with a new one |
| How (HOW) | Call in mechanical maintenance, shut down the line, replace the valve, and calibrate the system |
| When (WHEN) | July 15, 2026 |
| Executor (WHO) | João Silva — Mechanical Maintenance |
| Where (WHERE) | Machine room |
| Cost (HOW MUCH) | R$ 5,000.00 |
| Technical impact | 10 °C reduction in temperature deviation |
Quality — Defect rate above target
Scenario: The defect rate in the final product exceeded the established monthly target.
| Field | Value |
|---|---|
| Anomaly | Defect rate 3.2% above the 1.5% target in June |
| Cause (WHY) | Inadequate inspection process — operators without up-to-date training |
| Action (WHAT) | Review and apply the inspection procedure with all operators |
| How (HOW) | Schedule training groups, apply hands-on training on the line, and record completion in the system |
| When (WHEN) | June 30, 2026 |
| Executor (WHO) | Maria Souza — Quality Supervisor |
| Where (WHERE) | Production line |
| Cost (HOW MUCH) | R$ 2,000.00 |
| Technical impact | Reduction of the defect rate from 4.7% to 1.5% |
Safety — Lost-time accident occurrence
Scenario: Record of a lost-time accident due to lack of appropriate personal protective equipment.
| Field | Value |
|---|---|
| Anomaly | Lost-time accident (5 days) on the cutting line — right hand |
| Cause (WHY) | Lack of level-5 cut-resistant gloves for line operators |
| Action (WHAT) | Purchase and distribute level-5 cut-resistant gloves to all operators |
| How (HOW) | Survey the number of operators, issue a purchase order, receive and distribute with delivery record |
| When (WHEN) | June 20, 2026 |
| Executor (WHO) | Carlos Mendes — Workplace Safety |
| Where (WHERE) | Cutting line |
| Cost (HOW MUCH) | R$ 15,000.00 |
| Technical impact | Elimination of the cutting risk on the line — target: zero lost-time accidents |
| Financial impact (R$) | R$ 15,000.00 (cost avoided from lost time and labor litigation) |