Action Plan Lifecycle
This document describes the complete lifecycle of an Action Plan: the possible statuses of each action, the transitions between them, how to edit and reschedule, record execution, conduct effectiveness verification, cancel or delete actions, and view audit logs.
Haven't created a plan yet? See the step-by-step guide to creating an Action Plan before continuing.
Action Statuses
Each action within a plan has an individual status. The status is calculated automatically based on dates and user interactions, and reflects the actual state of the action in the process.
| Status | Description | Entry transition | Exit transition |
|---|---|---|---|
| On-time action | Action created and within the deadline defined in the "When" field | Action creation or update of the expected date | → Overdue action (automatic, via daily scheduler) |
| Overdue action | The "When" deadline was exceeded without the execution being recorded | Automatic (daily scheduler checks overdue dates) | — |
| Awaiting verification | The completion date was recorded, awaiting effectiveness verification | Recording of the completion date by the executor or responsible person | → Verification overdue (automatic) |
| Verification overdue | The configured effectiveness verification deadline was exceeded | Automatic (daily scheduler) | — |
| Completed action | Effectiveness verification confirmed that the action was effective within the deadline | Effectiveness verification with effectiveness confirmed within the deadline | Final status |
| Completed action (late) | Verification confirmed effectiveness, but outside the originally defined deadline | Effectiveness verification with effectiveness confirmed outside the deadline | Final status |
| Cancelled action | The action was manually cancelled by a user with the appropriate permission | Cancellation via context menu | Final status |
Status transition diagram
The diagram below illustrates all possible transitions between an action's statuses:
The system runs scheduled tasks daily to automatically update statuses from On-time action to Overdue action, and from Awaiting verification to Verification overdue. No manual action is required for these transitions to occur.
Editing an Action Plan
To edit an action plan or its components, right-click a row in the table and select the desired option from the context menu:
- Edit Action Plan — opens the plan's main form, allowing you to edit the header fields (Unit, Source, Indicator, Indicator subgroup / Project, Preparer).
- Edit Anomaly — opens the anomaly edit form (Description, Cause, cause analysis with the 5 Whys, and Attachments).
- Edit Action — opens the 5W2H sidebar of the selected action, allowing you to edit all action fields (Action, How, When, Where, Executor, Cost, Type, Regulatory deadline, Completion date, and impact fields).
- Actions in final statuses (
Completed action,Completed action (late),Cancelled action) cannot be edited. It is still possible to cancel them if necessary, but the fields remain locked for editing. - The effectiveness verification fields can only be filled in or changed through the effectiveness verification flow (context menu → "Perform effectiveness verification"). They cannot be edited directly through the action's edit form.
- Rescheduling an action can only be performed by the designated executor or the plan's preparer.
Rescheduling an Action
Rescheduling an action means recording a new expected execution date ("When"), while keeping the history of the original date for traceability and punctuality analysis purposes.
To reschedule, use the "Edit Action" option in the context menu, select Reschedule action, and update the When field. When you save, the system automatically records:
- Rescheduled from — the original date before the rescheduling.
- Justification — required field to record the reason for the rescheduling.
The original date is preserved in the Rescheduling date column of the table, which can be enabled in the visible columns settings.
Only the designated executor or the plan's preparer can reschedule an action. A rescheduling cannot be undone after confirmation; the history of the previous date is recorded for review in the audit logs.
Recording the action's execution
To record that an action has been executed, you can use two paths:
- Directly in the table — click the "not completed" tag in the Completed column of the corresponding row. The system will open a date picker to record the completion date.
- Through the action's sidebar — open the "Edit Action" form from the context menu and fill in the Completion date field.
After recording the completion date:
- If the action is configured with mandatory effectiveness verification, its status will move to
Awaiting verification. - If no verification is configured, the status will be updated directly to
Completed action(if within the deadline) orCompleted action (late)(if outside the deadline).
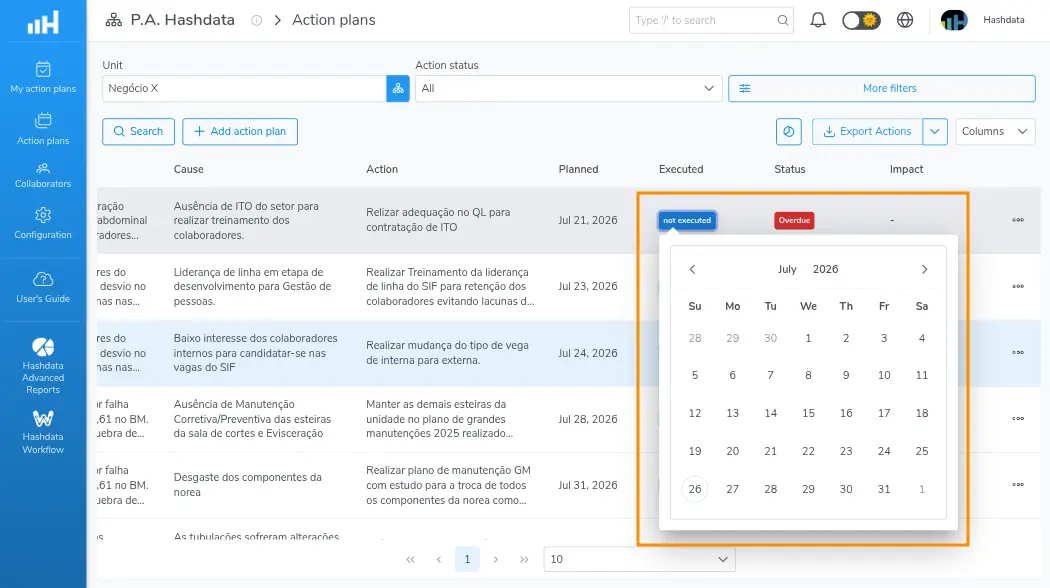
Recording the execution of an Action
Effectiveness Verification
Effectiveness verification confirms whether the executed action actually resolved the root cause identified in the anomaly. It is a critical step to ensure sustained improvement of the indicator.
To perform the verification, right-click the action in the table and select "Perform effectiveness verification". This option requires the Perform effectiveness verification permission.
The verification form requests the following fields:
- Completion date — date on which the verification was conducted.
- Effectiveness confirmed — indication of whether the action was effective (yes/no).
- Evidence — descriptive text with the observed evidence.
- Evidence files — attachments that support the result (photos, reports, spreadsheets, etc.).
Possible outcomes
a) Effective action
When effectiveness is confirmed, the action's status is automatically updated:
Completed action— if the verification was performed within the configured deadline.Completed action (late)— if the verification was performed outside the configured deadline.
b) Ineffective action
When effectiveness is not confirmed, the system prompts the creation of a new action linked to the original one. The new action starts with the On-time action status and inherits the anomaly and root cause context to make filling it in easier.
The original action remains in Awaiting verification or Verification overdue until a verification with confirmed effectiveness is recorded, or until the action is manually cancelled.

Performing the Effectiveness Verification of an Action
Cancelling an Action
To cancel an action, right-click it in the table and select "Cancel action". This operation requires the Cancel actions permission.
Actions in any status — including those already completed (Completed action and Completed action (late)) — can be cancelled. Cancellation moves the status to Cancelled action and records it in the audit logs with the identification of the responsible user.
Cancellation is irreversible. A cancelled action cannot return to any other status. If you want to permanently remove the record, use the deletion option.
Deleting an Action Plan
To delete records, right-click the desired row and select:
- "Delete action" — removes only the selected action.
- "Delete action plan" — removes the entire plan, including all its associated anomalies and actions.
Both operations require the Delete actions permission.
It is not possible to delete a plan that already has completed actions (Completed action or Completed action (late)). To remove a plan in this situation, cancel the actions that are still open and keep the historical record.
Deletion is permanent and irreversible. All plan data, including attachments and verification history, will be permanently removed.
Viewing audit logs
The system automatically records all relevant changes made to an action plan, including creations, edits, reschedulings, execution records, effectiveness verifications, cancellations, and deletions.
To access the history, right-click a row in the table and select "View logs". This option requires the View logs permission.
Each log entry contains:
- Date and time of the operation.
- Identification of the user who performed the action.
- Event type (creation, edit, cancellation, etc.).
- Changed fields, with the previous and new values.
Logs are read-only and cannot be edited or deleted, ensuring full traceability of the plan's lifecycle.