How to verify collections: individually or in bulk
With Collective Verification enabled, the review of collections happens right in the form's results table. Each row starts showing a status icon right next to the selection checkbox, and that's where verification starts: the icon shows whether that collection has already been reviewed and, with one click, opens the window to record the analysis or check what has already been recorded.
Verification can be done collection by collection, when each case deserves its own verdict, or in bulk, when the same understanding applies to many collections at once. Either way, the result is the same kind of record: a verification with author, date, analysis text, and result — and the chosen result applies to all collections in the verification group created at that moment.
- Collective verification needs to be enabled in the form's settings. Learn more about how to enable it.
- Recording verifications requires the Manage collected data permission, plus access to the form. Learn more...
- Anyone with only View collected data can see the statuses and the history, but can't record anything.
1. Where verification happens
In the form's menu, go to Results and open the Data tab. This table is where the incoming collections are, and it's where verification is done.
Adjust the table's period and filters as usual, the way you already do to check results: verification always works on what is listed and selected there. If you filter by unit, owner, or a date range, that's the subset that gets verified.
Verification is done only on the computer, through the web portal. It is not possible to record verifications through the mobile app.
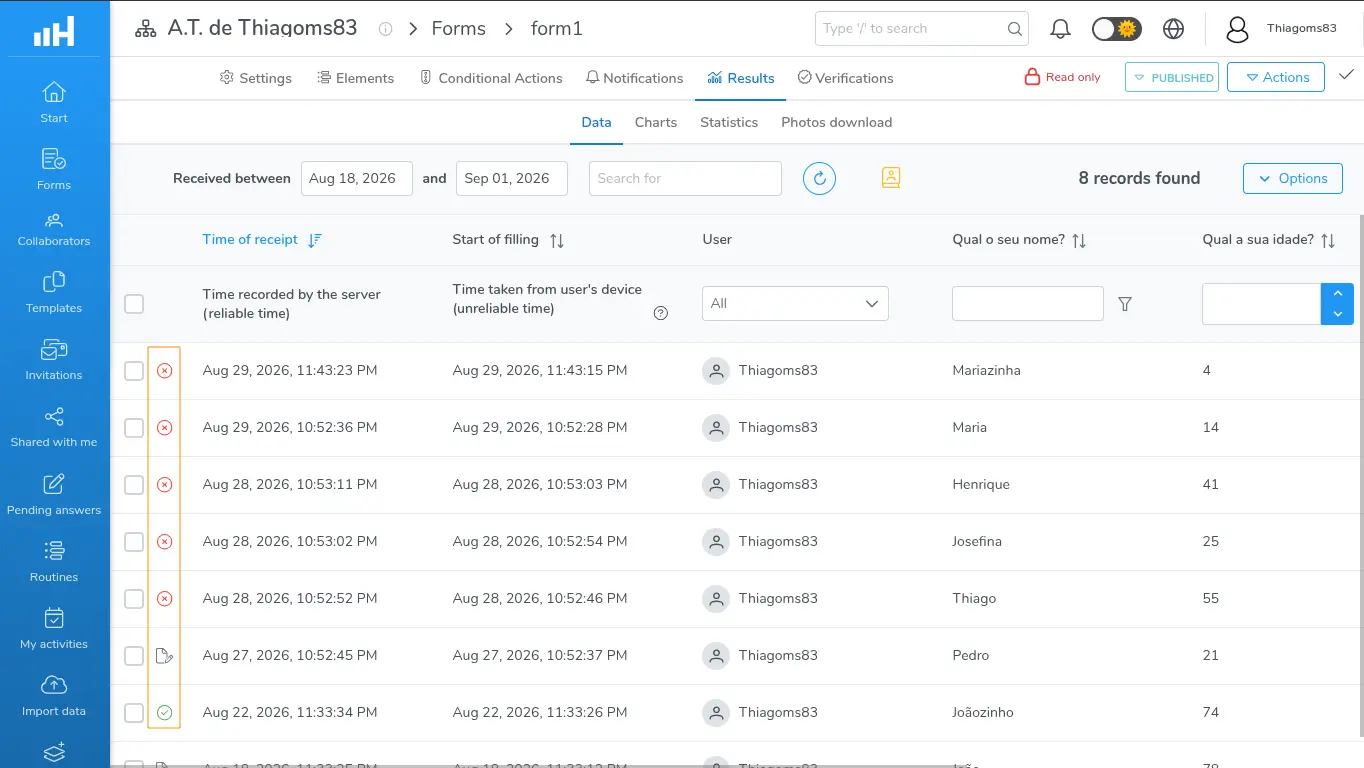
Results → Data tab with the selection checkbox and the status icon in the first column
2. The status icon of each collection
The icon is in the first column of the table, next to the row's selection checkbox. It always reflects the last record of the verification group the collection belongs to — that's why all collections in the same group always show the same icon.
Hover over the icon to see the corresponding tooltip:
| Icon | What it means | What happens when you click it |
|---|---|---|
| Gray document | "Not verified — click to verify": the collection doesn't belong to any group yet | Opens the Verification window to record the analysis (only for those who can record it) |
| Green circle with check | Approved: the group's last record approved the collections | Opens the Verifications window, with the group's history |
| Orange warning triangle | Pending: the last record left the group as pending | Opens the Verifications window, with the group's history |
| Red circle with X | Rejected: the group's last record rejected the collections | Opens the Verifications window, with the group's history |
Two important details:
- Clicking the row, outside the icon, opens the collection's extract — not the verification. To verify, click exactly on the status icon.
- Collections marked as draft and simulation collections also show the icon and can be verified.
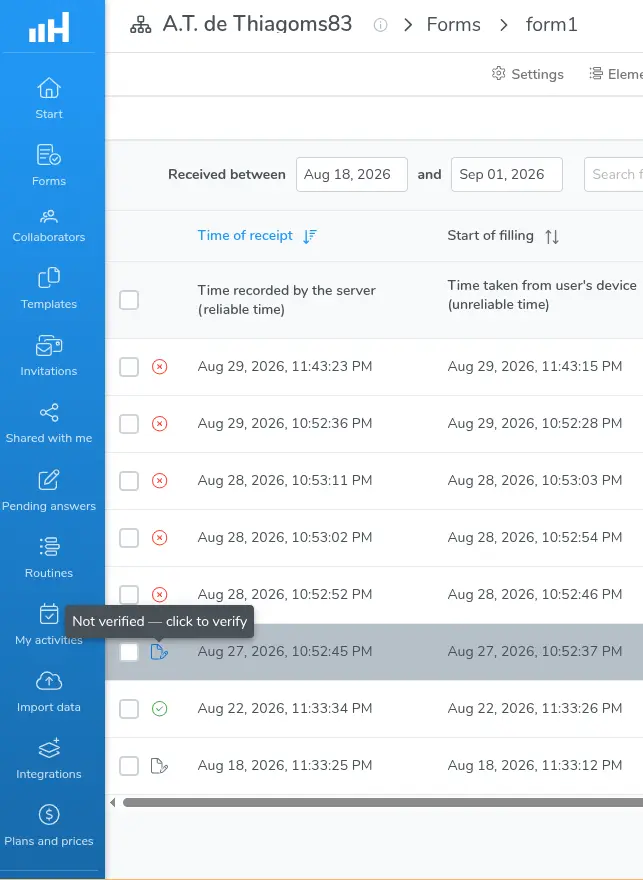
Gray icon with the tooltip "Not verified — click to verify"
3. Verify one collection
To review a single collection:
- Click the gray icon of the collection you want to verify — it opens the Verification window;
- Write your analysis in the Analysis / Report field (the field accepts up to 5,000 characters and stops accepting text once it reaches the limit);
- Under Result, choose Approved, Pending (when that option is allowed by the form's configuration), or Rejected;
- Click Save — or Cancel, if you want to discard the record.
Filling-in rules:
- Choosing a result is always required. Without it, the screen shows "Select a result" and nothing is saved;
- The Analysis / Report field is required when the result is Pending or Rejected. In that case, saving it blank shows "Justification is required when the result is not "Approved"" — text made up of only spaces is treated as empty;
- With Approved, the analysis is optional, but recommended: it's what explains, months later, why that set was approved.
Upon saving, the message "Verification recorded" appears and the row's icon changes immediately to the chosen result.
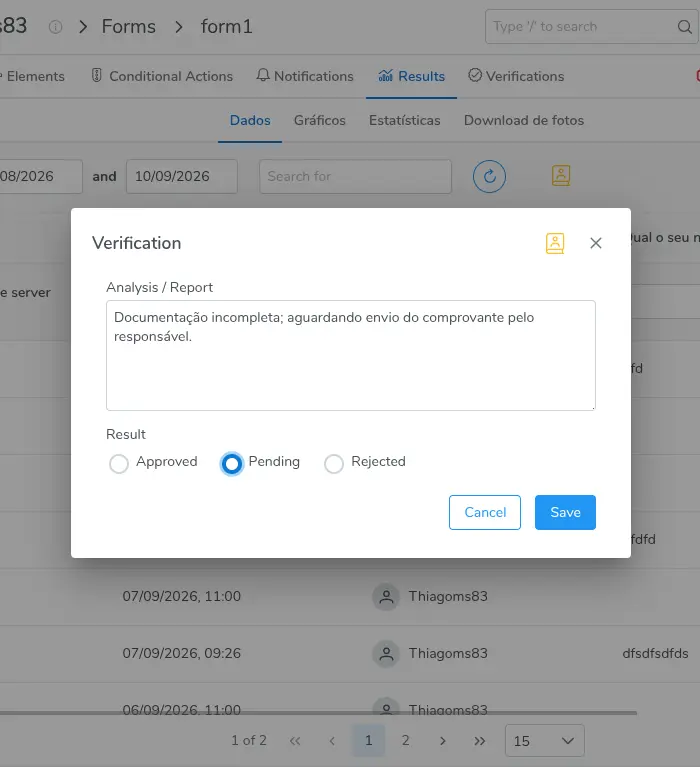
Verification window with the Analysis / Report field filled in and the Result options
4. Verify several collections in bulk
When the same verdict applies to a set of collections, verify in bulk:
- Select the checkboxes of the rows you want to verify — with at least one selected, the button panel appears with Remove, Remove all, and Bulk Verification;
- For a broad selection, select the table's header checkbox: a small window appears with "Select only the N records on this page" and "Select all N records in the query" — the second option selects everything that matches the current filters, including what's not on the visible page;
- Click Bulk Verification;
- Check the message at the top of the window, "You are verifying N collections." (singular, "You are verifying 1 collection.");
- Fill in Analysis / Report, choose the Result, and click Save.
The two selection methods behave differently. With manual selection, if any selected row is already verified, the Bulk Verification button is disabled and the tooltip "The selection contains already verified collections" appears on hover. In that case, deselect the rows with a green, orange, or red icon and the button becomes available again.
With "Select all N records in the query", on the other hand, the button remains active: the system itself refines the list at the moment of the click, keeping only the collections not yet verified within the current filters (the button shows a loading indicator for a few moments). If no collection is left to verify, the message "No verifiable collection in the selection" appears and no window opens.
Above 10,000 records, the selection is limited and the warning "Only the first N records were selected (query limit)." appears — only those records go into the verification group. If your query is larger than that, verify in smaller batches, narrowing the period or applying more filters.
After saving, the message "Verification recorded" appears, the icons of all affected rows are updated immediately, and the table's selection is cleared automatically.
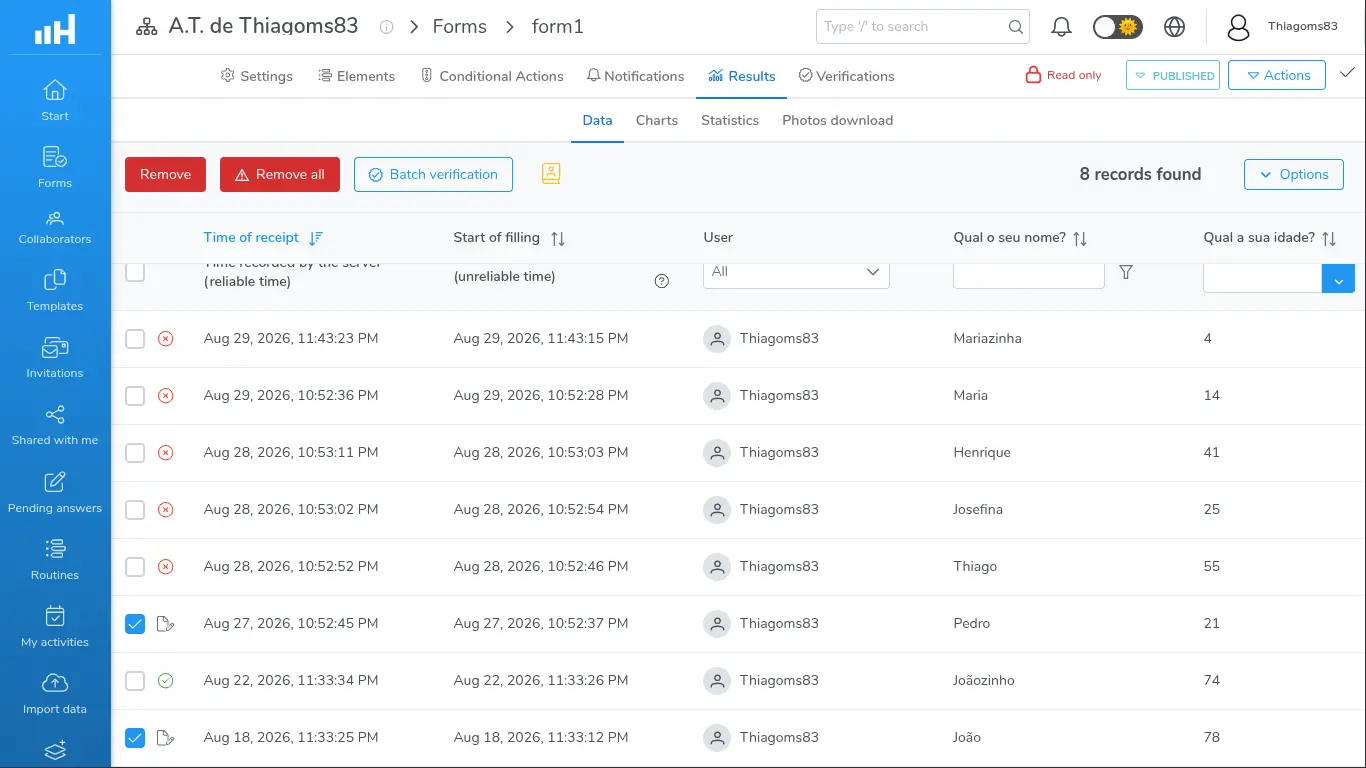
Remove, Remove all, and Bulk Verification button panel after selecting several rows

Bulk Verification window with the message "You are verifying N collections." at the top
5. Add a new verification to a group
An already verified collection doesn't go into another verification group. That's why, when the understanding about a set changes — the pending issue was resolved, a document arrived, a doubt was clarified — the way to do it is not to verify again, but to add a record to the existing group:
- Click the collection's status icon (green, orange, or red) — it opens the Verifications window, with the group's history;
- Click New Verification;
- Fill in Analysis / Report, choose the Result, and save.
The new record is added to the end of the history, without erasing or changing the previous ones. From that point on, the current status of all collections in the group becomes that of the last record — the icons of all rows in the group change together.
When the group's current status is Approved, the New Verification button is not shown and the window shows "This verification has already been approved and does not accept new records.". Groups that are Pending or Rejected keep accepting new records normally.
Learn more about the history window, the verification ID, and generating the PDF.
6. Rules that always apply
These rules come from the verification group's lifecycle (Learn more...). In practice, for whoever is verifying, they mean:
- Every verification creates a verification group, and the set of collections in that group doesn't change afterward: collections can't be added to or removed from it;
- A collection belongs to at most one group — that's why there's no "verify again", just New Verification on the existing group;
- The history is append-only: there's no editing, deleting, or undoing a verification;
- The recorded result applies to all collections in the group at the same time;
- Verified collections can still be selected for other table actions, like removing or exporting — verification doesn't lock those operations;
- If the form uses Response-Level Security, you only see, select, and verify the subset of collections you have permission to see.
7. Messages and common issues
| Message | What it means and what to do |
|---|---|
| "Justification is required when the result is not "Approved"" | You selected Pending or Rejected without writing anything in Analysis / Report. Describe the reason and save again. |
| "Select a result" | You need to select Approved, Pending, or Rejected before saving. |
| "The selection contains already verified collections" | Tooltip for the disabled Bulk Verification button: at least one selected row already belongs to a group. Deselect those rows or use "Select all N records in the query". |
| "No verifiable collection in the selection" | All collections matching the current filters have already been verified. Widen the period or review the filters. |
| "One or more selected collections already belong to a verification. Refresh the page and try again." | Someone else verified some of these collections while you were filling in the window. Refresh the screen and redo the selection with what's left. |
| "Collective verification is not enabled on this form." | The feature was turned off in the form's settings. Ask for it to be re-enabled — Learn more... |
| "This verification has already been approved and does not accept new records." | The group is closed because it was approved. There's no way to reopen it or edit the history. |
| "Access denied: user without permission to perform the operation." | The Manage collected data permission is missing, or you don't have access to the form. Talk to the workspace manager. |
8. Use cases
Weekly review of field measurements
Scenario: the field team submits measurement checklists daily and audit validates, at the start of the week, everything that arrived during the previous week.
Recommended setup: Collective verification Enabled, with Allow "Pending" result — that way doubtful cases can be sent back without being rejected.
What happens in practice:
- The analyst filters the previous week in Results → Data;
- Selects the header checkbox and chooses "Select all N records in the query";
- Clicks Bulk Verification and checks the message "You are verifying N collections.";
- Writes in Analysis / Report: "Weekly review of measurements: complete documentation and readable photos" and marks Approved;
- A single verification group covers the entire week, and all rows start showing the green check.
Invoice with a pending issue and later approval
Scenario: collections with an attached invoice arrive throughout the month and finance checks the amount and legibility of the document, case by case.
Recommended setup: Collective verification Enabled, with Allow "Pending" result.
What happens in practice:
- The analyst clicks the collection's gray icon, writes "Illegible attachment; resubmission requested from the supplier on 03/12" and marks Pending — the row starts showing the orange triangle;
- When the correct document arrives, they click the same icon, now orange, and use New Verification;
- They write "Invoice resubmitted and checked — amount matches the order" and mark Approved;
- The group is closed and the history preserves both moments, each with its author, date, and time.
Sampling inspection
Scenario: hundreds of inspections arrive each month and internal policy requires auditing only a sample.
Recommended setup: Collective verification Enabled, with Don't allow "Pending" result — to force a binary decision on each sample.
What happens in practice:
- The analyst filters by unit and manually selects the rows drawn for the sample;
- Uses Bulk Verification and records the criteria in Analysis / Report: "10% sample of the North unit's inspections — draw on 04/05";
- It stays documented exactly which set was audited;
- Collections outside the sample keep the gray icon, making visible what was not audited.
Rejection with return to the collector
Scenario: a collection arrived with inconsistent data and the supervisor needs to formally record the rejection before asking for the collection to be redone.
Recommended setup: Collective verification Enabled; the supervisor needs the Manage collected data permission.
What happens in practice:
- The supervisor clicks the gray icon, writes the detailed reason ("Meter reading doesn't match the attached photo; redo the collection on site") — the justification is required in this case — and marks Rejected;
- The row starts showing the red X, visible to everyone who checks the results;
- They open the red icon, copy the verification ID, and generate the PDF to attach to the ticket sent to the field team (Learn more...);
- The group keeps accepting New Verification for when the pending issue is resolved.
The form, unit, and analysis text names used in the examples are fictional. Use the names and criteria that make sense for your operation.
Next steps
- Learn more about how to check the history, filter the verification groups, and generate the PDF;
- Learn more about how to turn this review into a periodic requirement;
- Learn more about the form's configuration options.