Checking and tracking verifications
Once verifications start being recorded, the question shifts. It's no longer about deciding whether a collection is correct, but about answering who verified what, when they did it, with what verdict — and how to prove it to a client, to management, or to an auditor who shows up months later asking for the history of a specific case.
The Verifications tab answers these questions. It lists the form's verification groups and, from each group, you open the full history, copy the verification ID, generate a PDF with everything that was reviewed, or jump straight to the collections that group covers. The reverse path also exists: from any collection you get to the group it belongs to.
The Verifications tab only appears in the form's menu when Collective verification is enabled in that form's Settings and your user has the View collected data or Manage collected data permission. Without one of these permissions, the item doesn't appear in the menu and, if the address is accessed directly, the screen shows User without permission, with the message "Access denied: user without permission to perform the operation.". Learn more about how to enable the feature.
1. The Verifications tab
In the form's menu, the Verifications item is right after Results. It lists verification groups, not collections: a bulk verification of 30 collections appears as a single row, with "30 records verified".
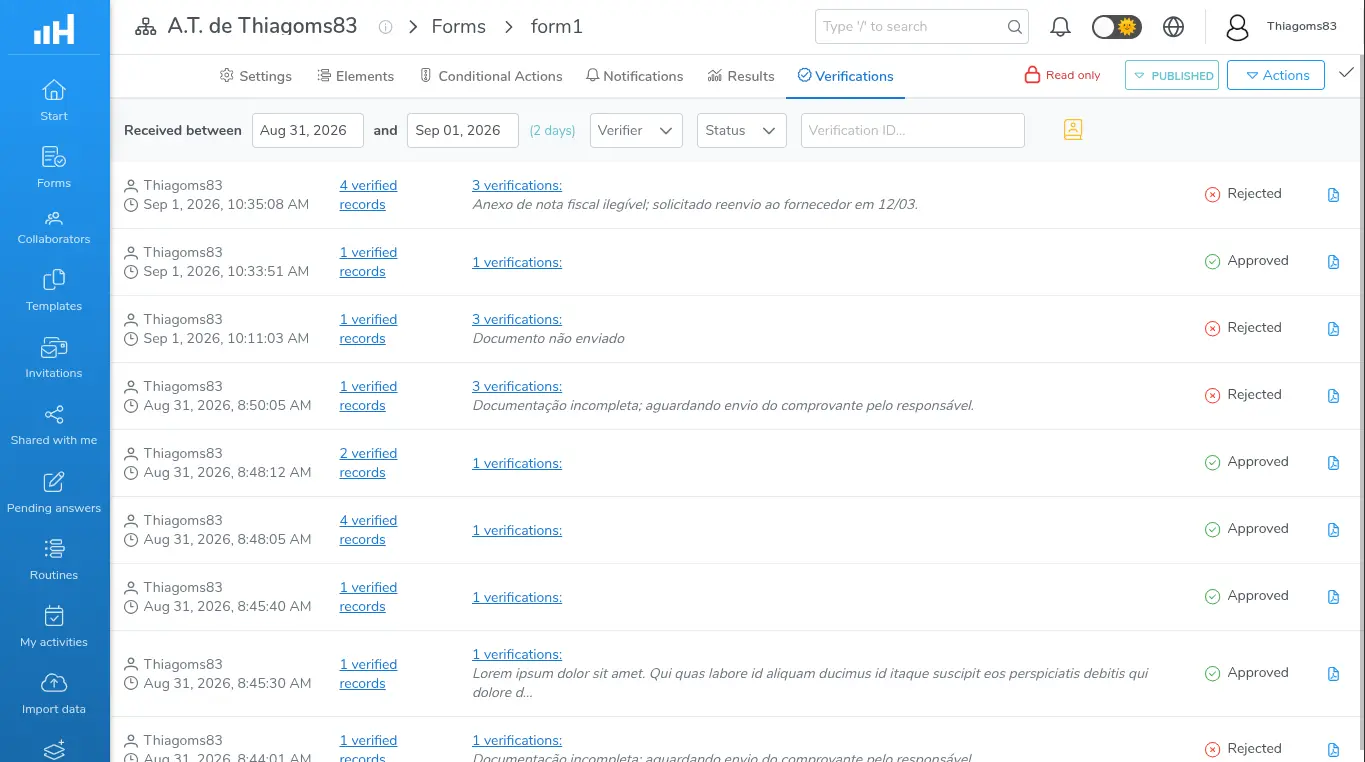
Complete Verifications tab, with the filter row and groups in different statuses
The table has no column headers — reading is done by the position of each piece of information in the row:
- The name of the verifier who made the group's last verification, with the date and time of that verification;
- The "N records verified" link, which leads to the group's collections;
- The "N verifications:" link, followed by an excerpt of the last comment recorded;
- The group's current result: Approved, Pending, or Rejected;
- The Generate PDF button, on the right.
The comment excerpt shown in the list is cut off at around 120 characters. The full text of the Analysis / Report appears in the history window and in the group's PDF.
Groups are ordered from the most recent verification to the oldest, and pagination only appears when the result has more than 10 groups.
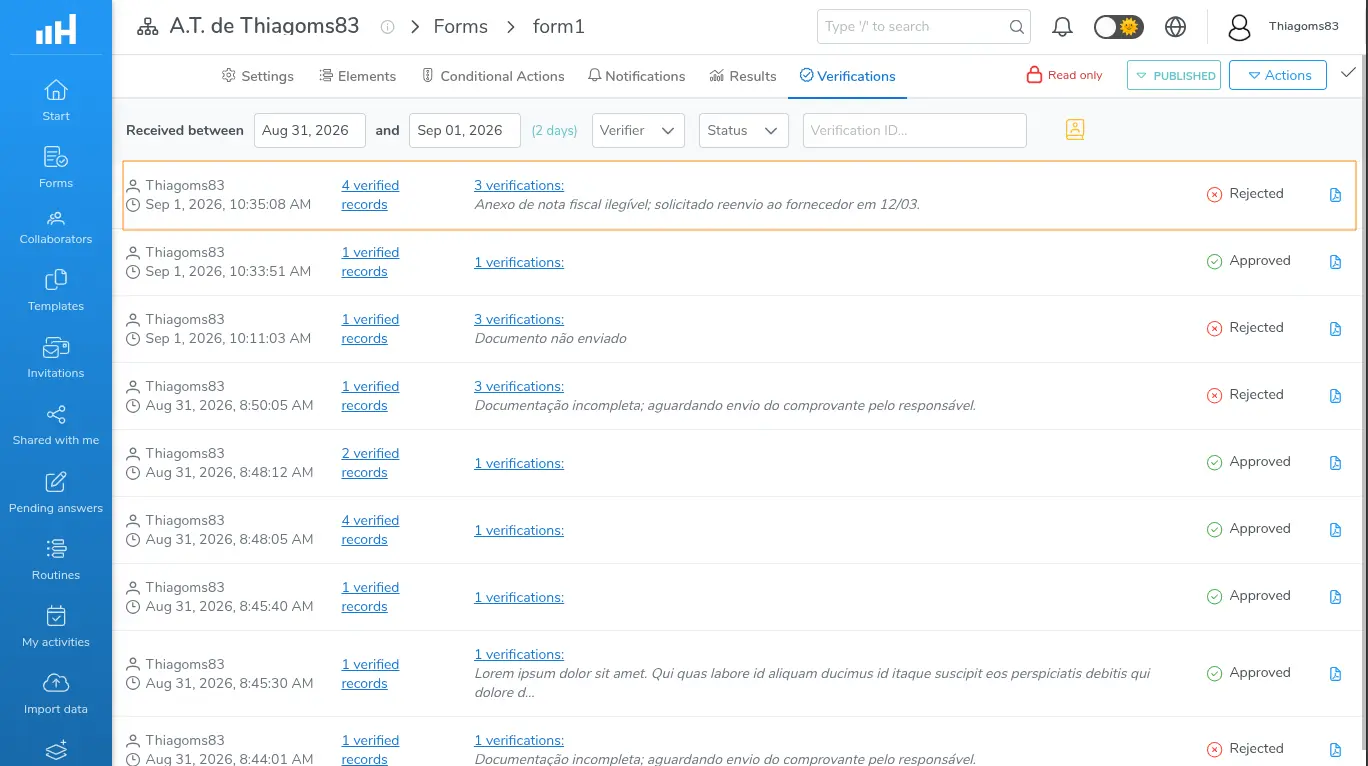
Detail of a row on the Verifications tab, with verifier, date, result, and PDF button
2. Filters
The filter row at the top of the tab has four fields, and the list reloads automatically with every change:
- Received between ... and ...: comes filled in with the last 14 days. On this tab, it filters by the date of the group's last verification. Next to the fields, the number of days in the chosen range is shown;
- Verifier: multi-select of collaborators. Finds groups in which the person made any of the verifications in the history, even if it wasn't the last one;
- Status: multi-select among Approved, Pending, and Rejected. It considers the group's current result, not intermediate results in the history;
- Verification ID...: paste the group's code and press Enter.
It's the same label used on the Data tab, but on this tab it refers to the date of the group's last verification. Searching for a group by the date the collections arrived doesn't work: a group can gather collections from several days and have been verified weeks later.
The Verification ID... filter ignores the period — a group could have been verified on any date and the goal is to find it directly by its code. The Verifier and Status filters still apply, though: if the group you're looking for doesn't match them, nothing is listed.
When no group matches the filters, the table shows the message "No results found".
3. A group's history
Clicking "N verifications:" (on the Verifications tab) or the status icon of an already verified collection (on the Data tab) opens the same window, called Verifications. This is where the group's complete trail is.
From top to bottom, the window shows:
- The count "N records verified", that is, how many collections the group covers;
- The "ID: ..." line, with a copy button whose tooltip is "Copy ID to clipboard". Once copied, the screen confirms with "ID copied to clipboard";
- The list of verifications, in order, each with the verifier's name, the date and time, the full text of the Analysis / Report, and the result tag;
- The New Verification, Generate PDF, and Close buttons.
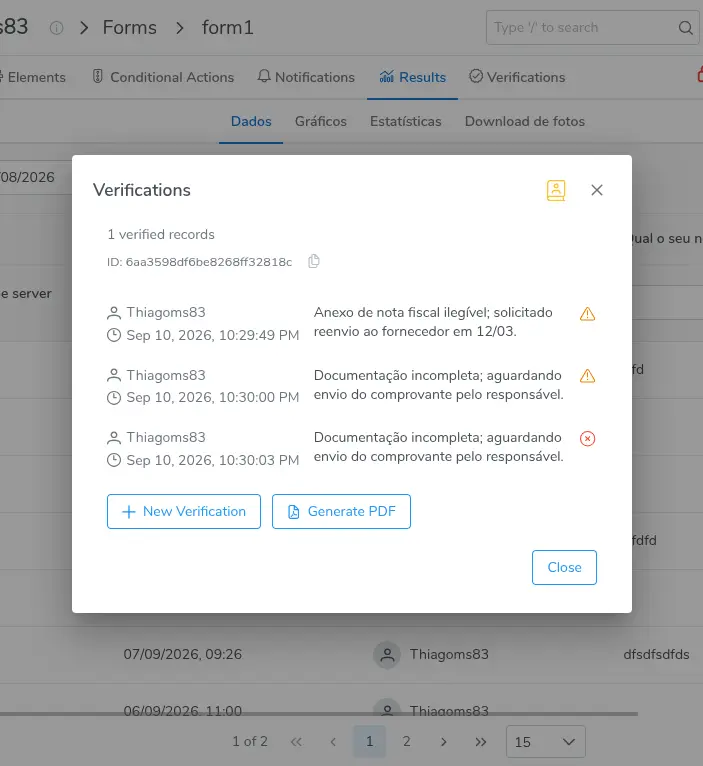
Verifications window with the group history and the New Verification, Generate PDF, and Close buttons
The New Verification button doesn't always appear. It's hidden for those who only have the View collected data permission, and also when the group is already Approved — in that case, the window shows "This verification has already been approved and does not accept new records.". Learn more... about how to record a new verification on a group that still accepts records.
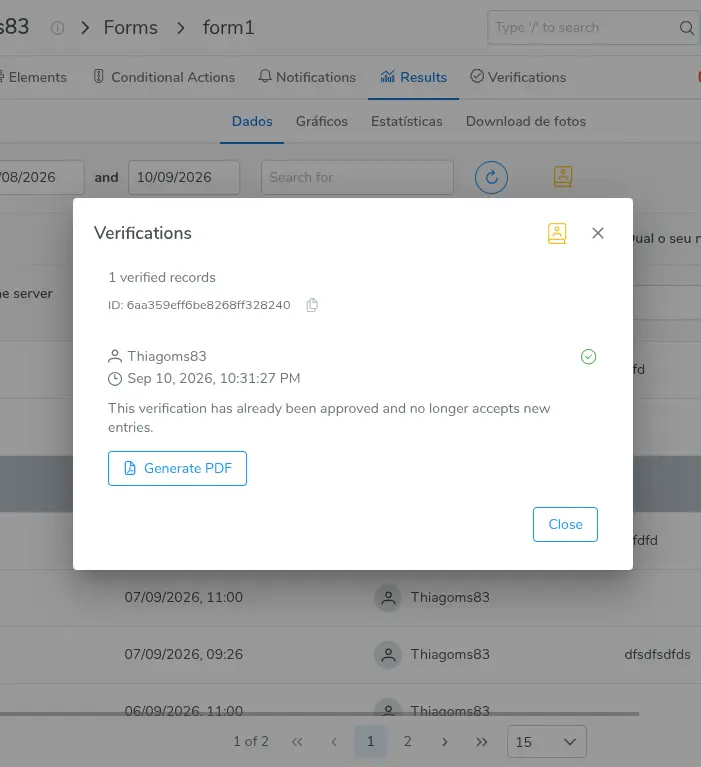
Verifications window of an approved group, without the New Verification button
The verification ID identifies the group in emails, tickets, and audits, and it's exactly the code you paste into the Verification ID... filter to find the group again later — even months later.
4. Generate the verification's PDF
The Generate PDF button exists in two places — on the row of the Verifications tab and inside the Verifications window — and both generate the report for that group.
- Click Generate PDF;
- The PDF export settings panel opens, with the same options as the collections export;
- Adjust what's needed and click Export PDF.
What changes compared to the regular Results PDF:
- The group's PDF covers exactly the collections that are part of it — no more, no less;
- That's why the panel doesn't ask for a collection range (Starting collection / Ending collection): choosing a range would be misleading, since the group's set is fixed;
- The file starts with the Collective Verifications section, which shows the number of records verified, the line "Verification ID: ...", and, for each verification, the verifier, the date and time, the justification, and the result. Only after that come the collections;
- The verification ID is also printed in the footer of every page, for traceability of the printed document;
- This initial section only exists in a PDF generated from a group. The regular Results PDF stays the same — Learn more about exporting collections to PDF.
Groups with up to 3 collections generate the PDF right away. Above that, the file is prepared in the background and you're notified when it's ready. The limit remains 500 collections per PDF.

First page of the group's PDF, with the Collective Verifications section
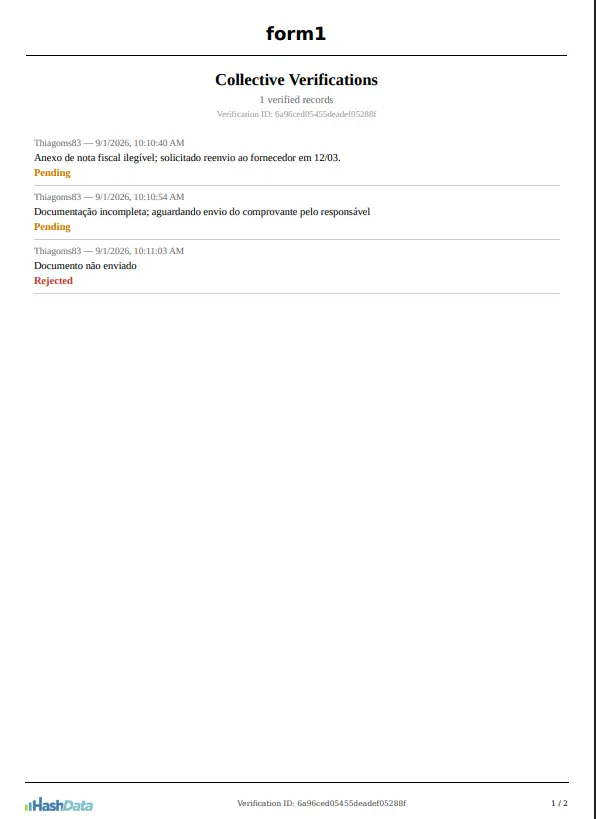
Footer of a PDF page showing the verification ID
5. See a group's collections
To leave the verification and get to the collections, click the "N records verified" link. You're taken to Results → Data showing only that group's collections, with the filter tag "Collections from the selected verification (N records)" at the top of the list.
While this filter is active, the Received between period filter is hidden. This is expected: a group's collections can be from any date, and a period filter could hide part of them. To go back to the regular listing, click the tag's trash icon, whose tooltip is "Remove filter" — the period filter reappears.
The address of this filtered screen can be copied from the browser and sent to someone else with access to the form: they open exactly the same list of collections.
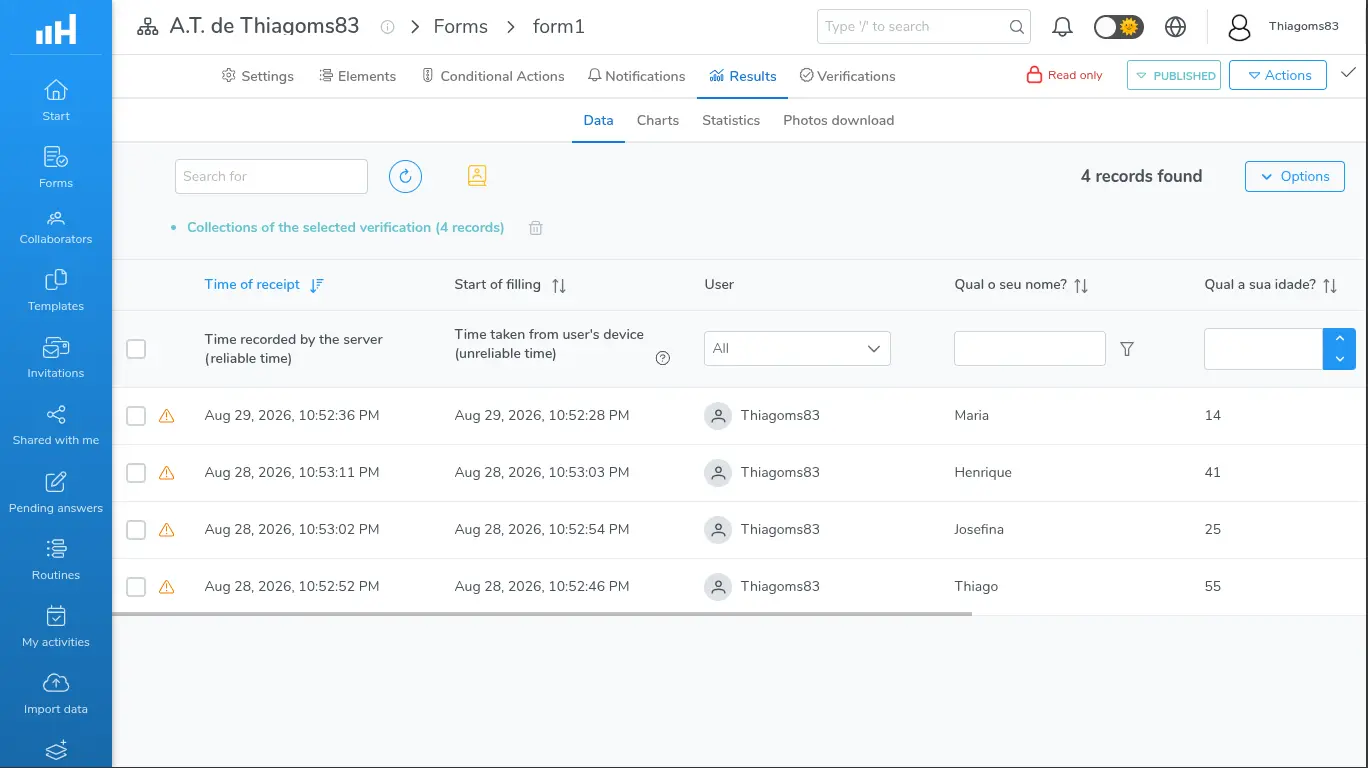
Data tab with the "Collections from the selected verification" tag at the top
6. From the collection's extract to the verification
The reverse path starts from a collection:
- In Results → Data, click the collection's row to open the Collection extract;
- Go to the Links tab;
- Find the Collective Verification card, which shows the group's record count and the history of that collection's verifications.
The card counts toward the number shown next to the Links tab's name and only appears if that collection already belongs to a group. In the corner of the card there's a shortcut button, whose tooltip is "View on the Verifications tab": it closes the extract and opens the Verifications tab already filtered by that group's ID.
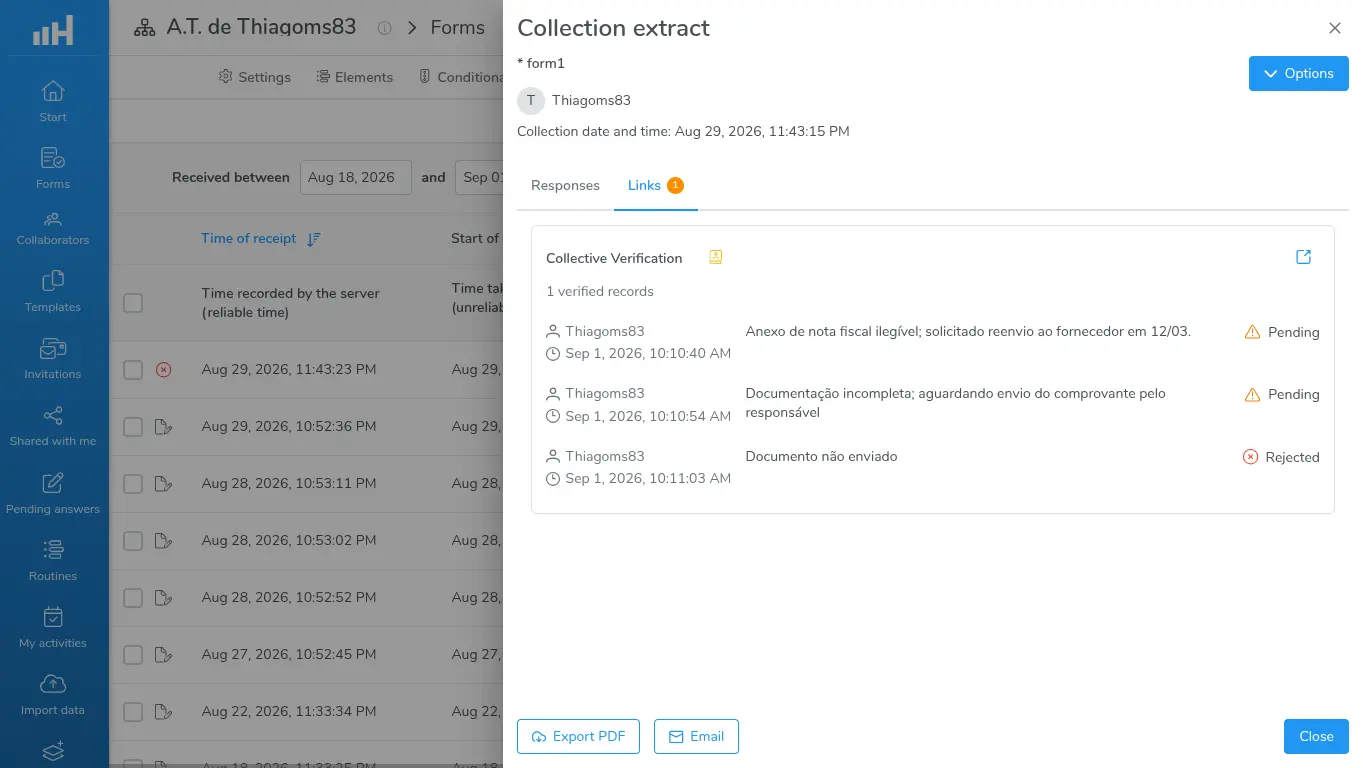
Collection extract on the Links tab, with the Collective Verification card
7. Verification status in Hashdata Advanced Reports
Besides the form's screens, the verification status also goes to Hashdata Advanced Reports. For that, Collective verification needs to be enabled on the form and the integration with Hashdata Advanced Reports needs to be active on the form and in the workspace — Learn more about advanced reports.
With these conditions met, each collection starts carrying three pieces of information:
- The verification status: Approved, Pending, Rejected, or the value NOT_VERIFIED, used when the collection hasn't been verified yet;
- The ID of the verification group it belongs to;
- The date of that group's last verification.
With these fields, you can build:
- Coverage dashboards — verified vs. not verified — by period and by unit;
- Rejection tracking, cross-referencing the result with any other information about the collection;
- The measure of how long, on average, a collection takes to be verified, comparing the date of the last verification with the date it was received.
Recording a verification causes the group's collections to be resent to the advanced reports with the updated status, and that takes a few moments: seeing different numbers between the screen and the panel right after a verification is normal. Old collections start showing the verification fields as they get updated, and, once the feature is disabled, those fields stop being sent in the next updates.
Exporting Results to CSV or Excel does not carry the verification status. To take this information outside the system, use the group's PDF or Hashdata Advanced Reports.
8. Common issues
| Situation | What to do |
|---|---|
| "No results found" on the Verifications tab | The default period is only 14 days, or the Verifier / Status filters are narrowing the result. Widen the period or clear the filters. |
| I searched by Verification ID... and found nothing | Check whether Verifier or Status are filled in: they keep being applied together with the ID. |
| Incomplete ID or with extra characters | The system refuses the query with "Unable to save the data due to a validation error. Check the changed fields and try again.". Copy the full ID using the copy button in the Verifications window. |
| "The query exceeded the allowed results limit" | The selected period returns too many groups. Narrow the date range or use the Verifier and Status filters. |
| The New Verification button doesn't appear | The Manage collected data permission is missing, or the group is already Approved and doesn't accept new records. |
| The date filter is gone from the Data tab | You arrived through a group's link. Remove the "Collections from the selected verification" tag using the Remove filter button and the period filter comes back. |
| The Collective Verification card doesn't appear on the extract | That collection hasn't been verified yet — the card only exists when the collection belongs to a group. |
| I can't find the status in the CSV or Excel export | Those files don't carry that information. Use the group's PDF or Hashdata Advanced Reports. |
There's no column filter by verification status on the Data tab. There are three ways to narrow collections by status: enter through the "N records verified" link of a group; use Bulk Verification with the selection of all collections matching the query, which discards already verified ones on its own; and use Hashdata Advanced Reports, where status is a filterable field.
Next steps
- Learn more about how to record verifications, individually or in bulk;
- Learn more about how to periodically require verification, with a routine task;
- Learn more about the lifecycle of a verification group.